Learn how to create an easy rose drawing in Procreate with 4 beginner-friendly styles: basic, folksy, cutesy, and stained glass.
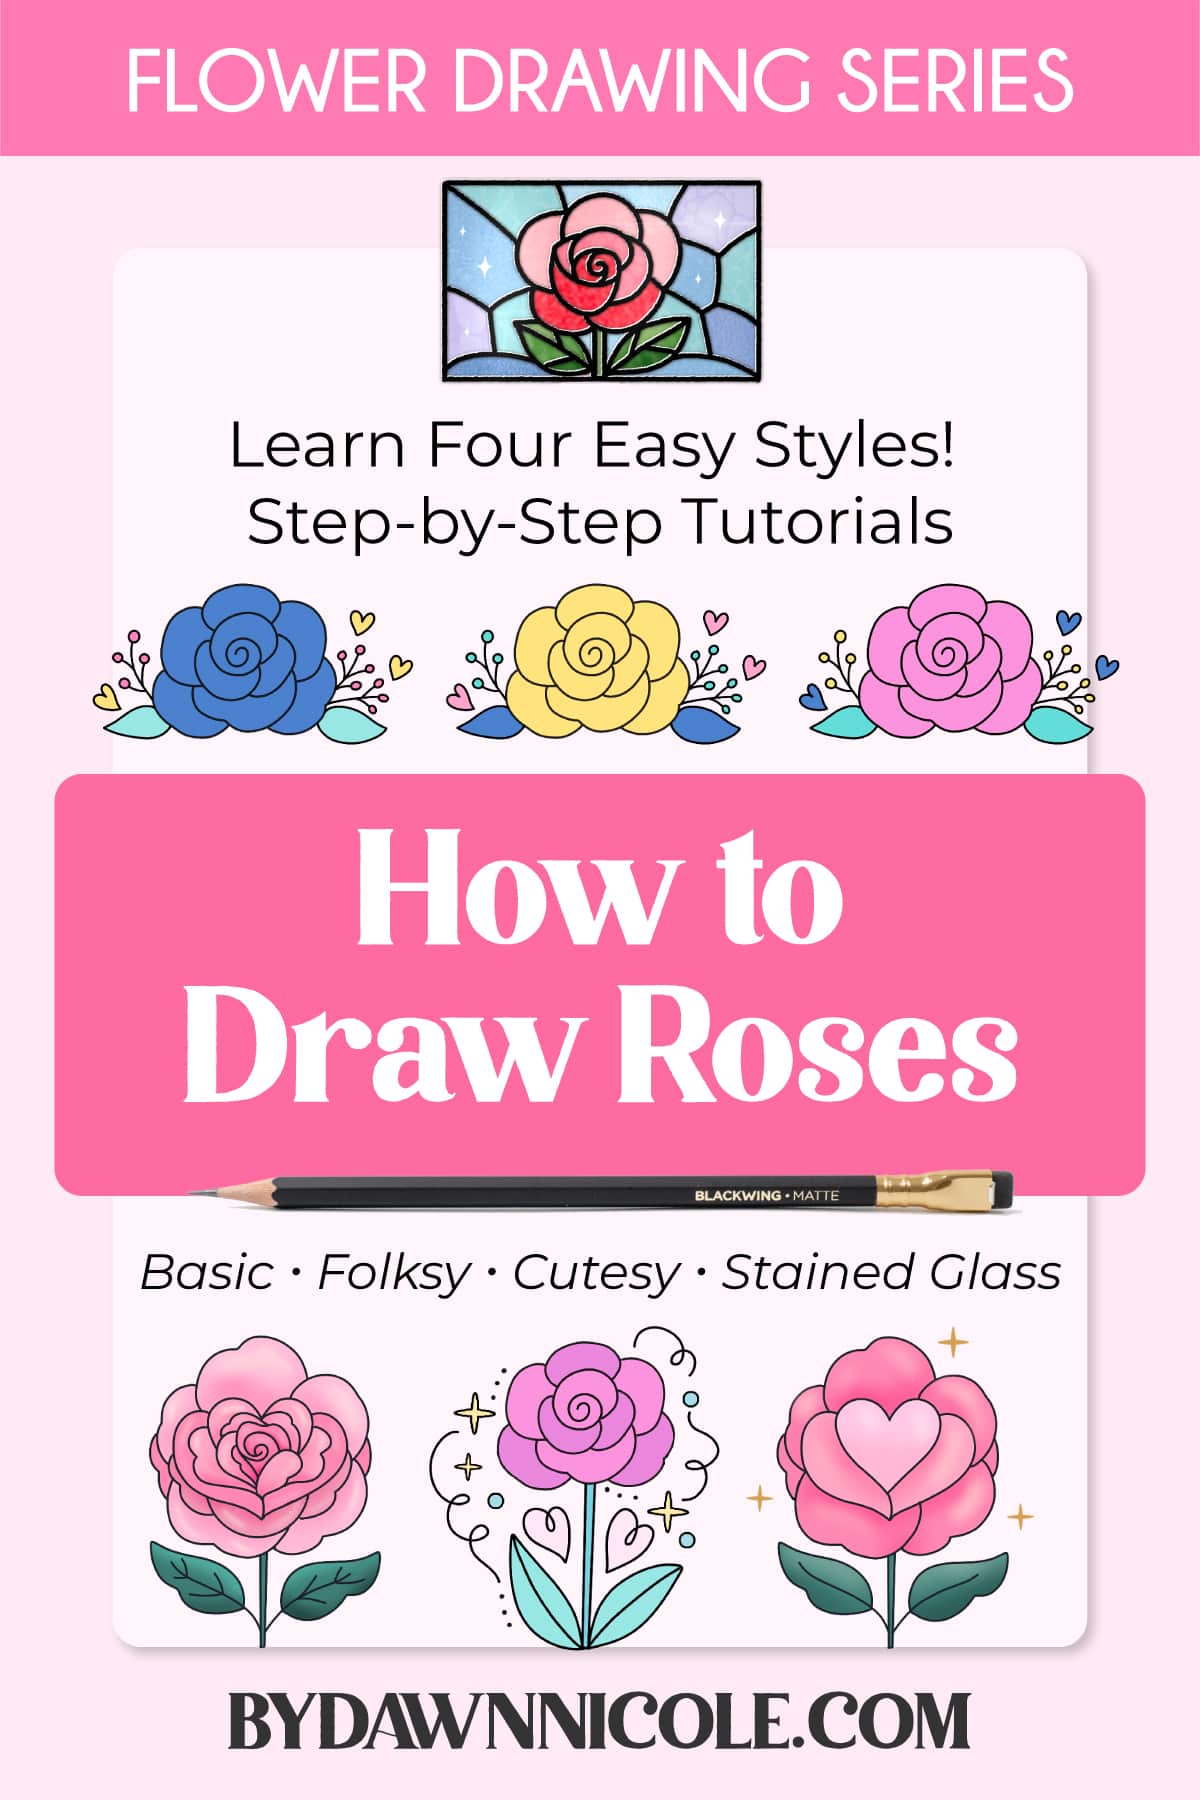
Easy Rose Drawing Tutorial (4 Beginner-Friendly Styles)
Welcome to the first tutorial of my new flower drawing series!
Roses are one of the most classic flowers to draw, but they can feel surprisingly intimidating when you’re first starting out. The good news? Creating an easy rose drawing is much simpler once you break the flower down into a few basic petal shapes and work one layer at a time.
In this beginner-friendly Procreate tutorial, I’ll show you how to draw a rose in 4 different styles: basic (with a twist), cutesy, folksy, and stained glass-inspired. Each rose has its own unique look and personality, making this a fun way to experiment with different brushes, textures, and illustration styles while building your floral drawing skills.
Whether you’re looking for simple rose drawing ideas, practicing digital flower illustrations, or just wanting a relaxing, creative project, these easy rose drawings are a great place to start.
Grab your iPad, open Procreate, and let’s draw some roses that are playful and full of personality!
What You’ll Need
Anything you can draw with! While I did these on my iPad in the Procreate App, you can follow along with traditional supplies as well. You can check out my favorite digital and physical art supplies on my Amazon page!
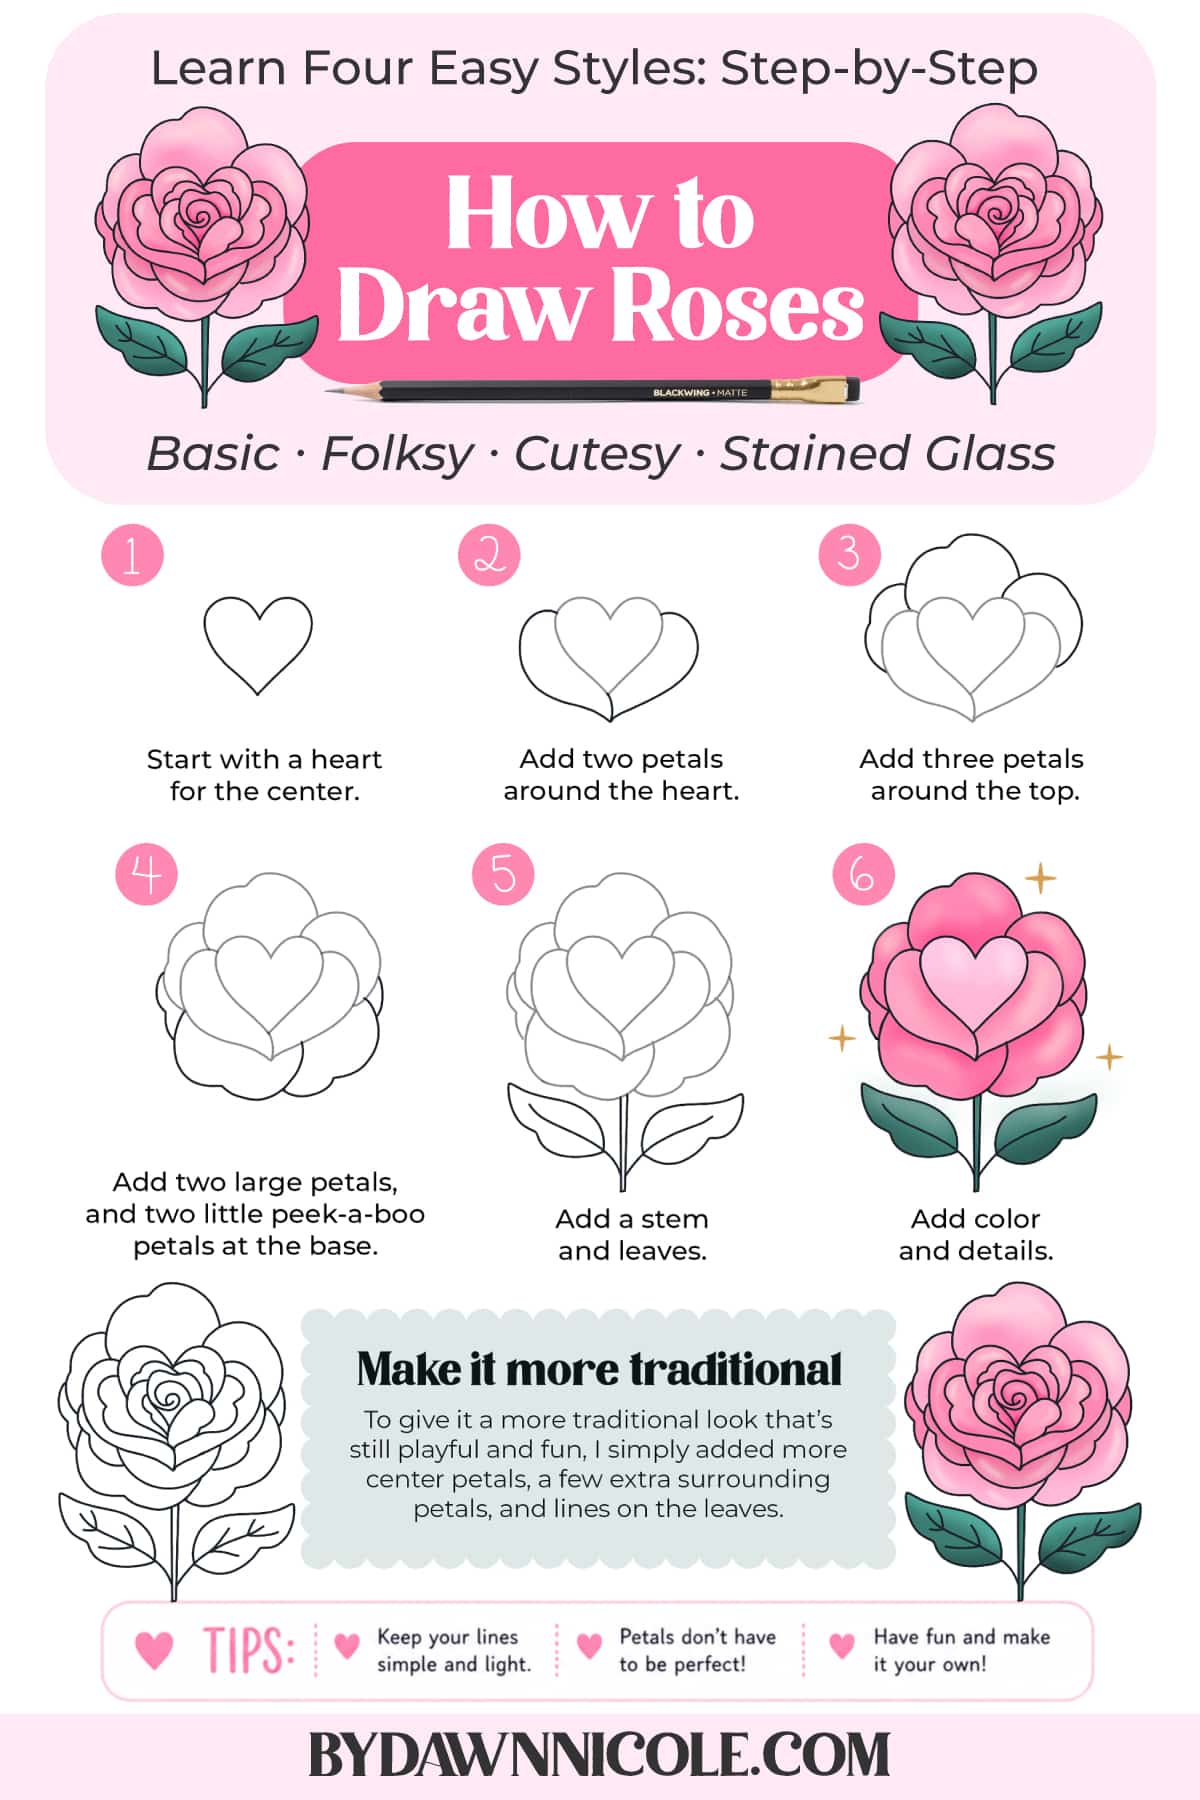
Easy BASIC Rose Drawing
There is no shortage of super traditional rose tutorials online, so I’m giving this a playful twist and infusing it with my style. We’ll start with a heart center, which makes it easier than most step-by-step beginner tutorials. You can see in the graphic below that I’ve shown you an option to make it more traditional by adding more petals and leaf details.
If this is your favorite style, check out my Enchanted Botanicals Stamp Kit for Procreate.
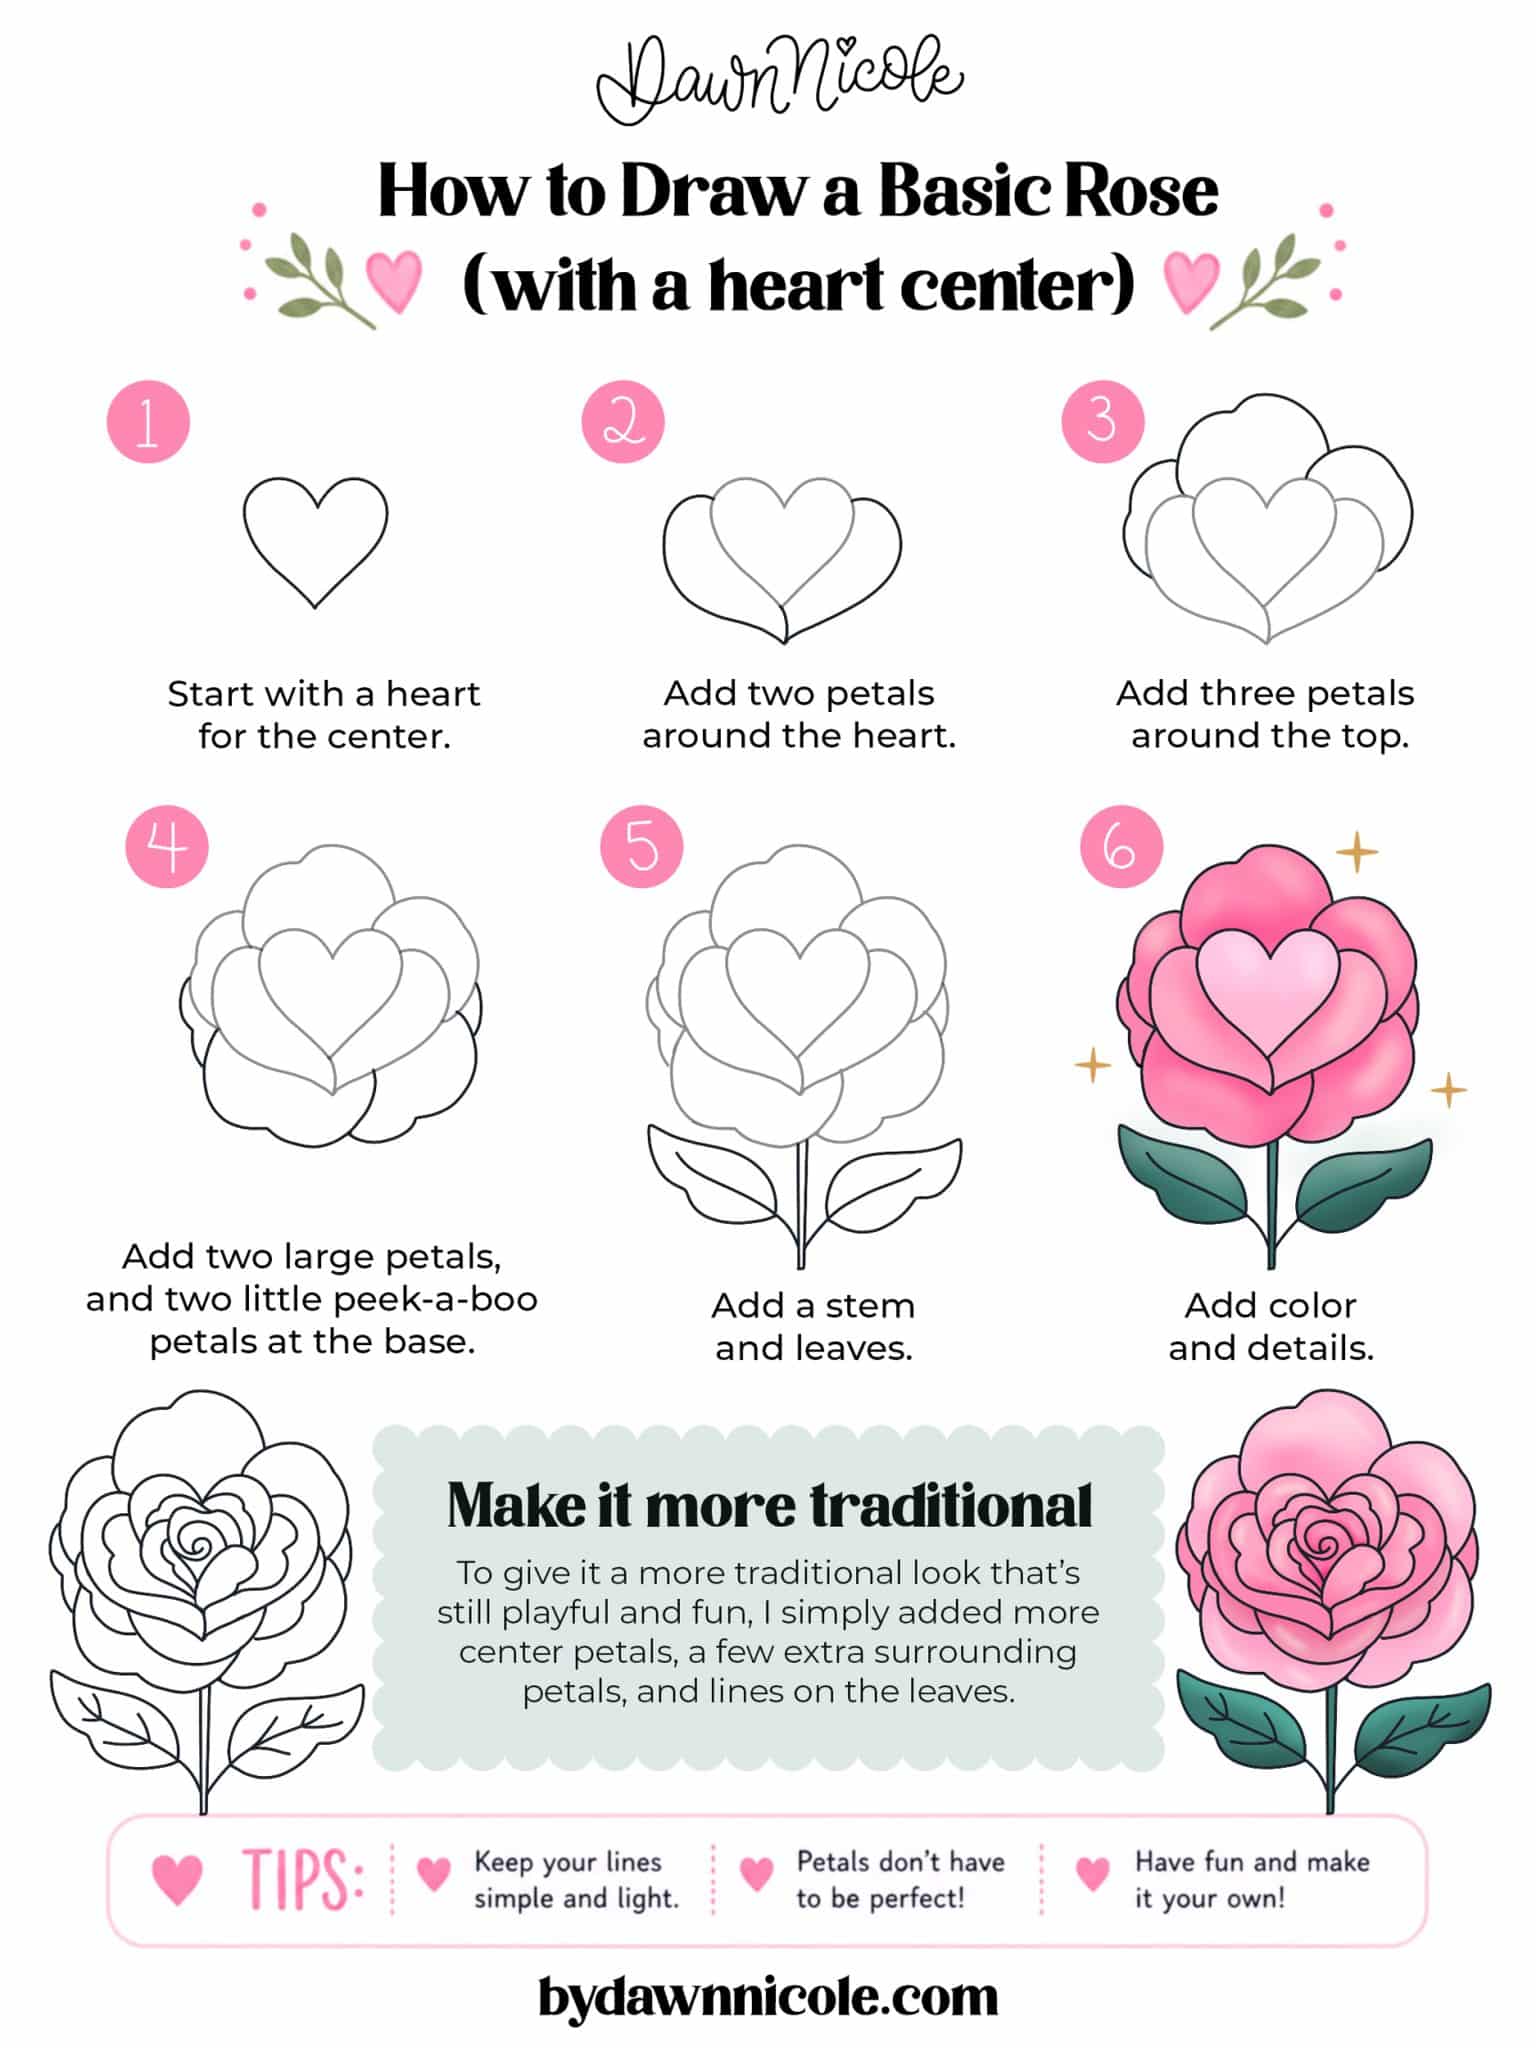
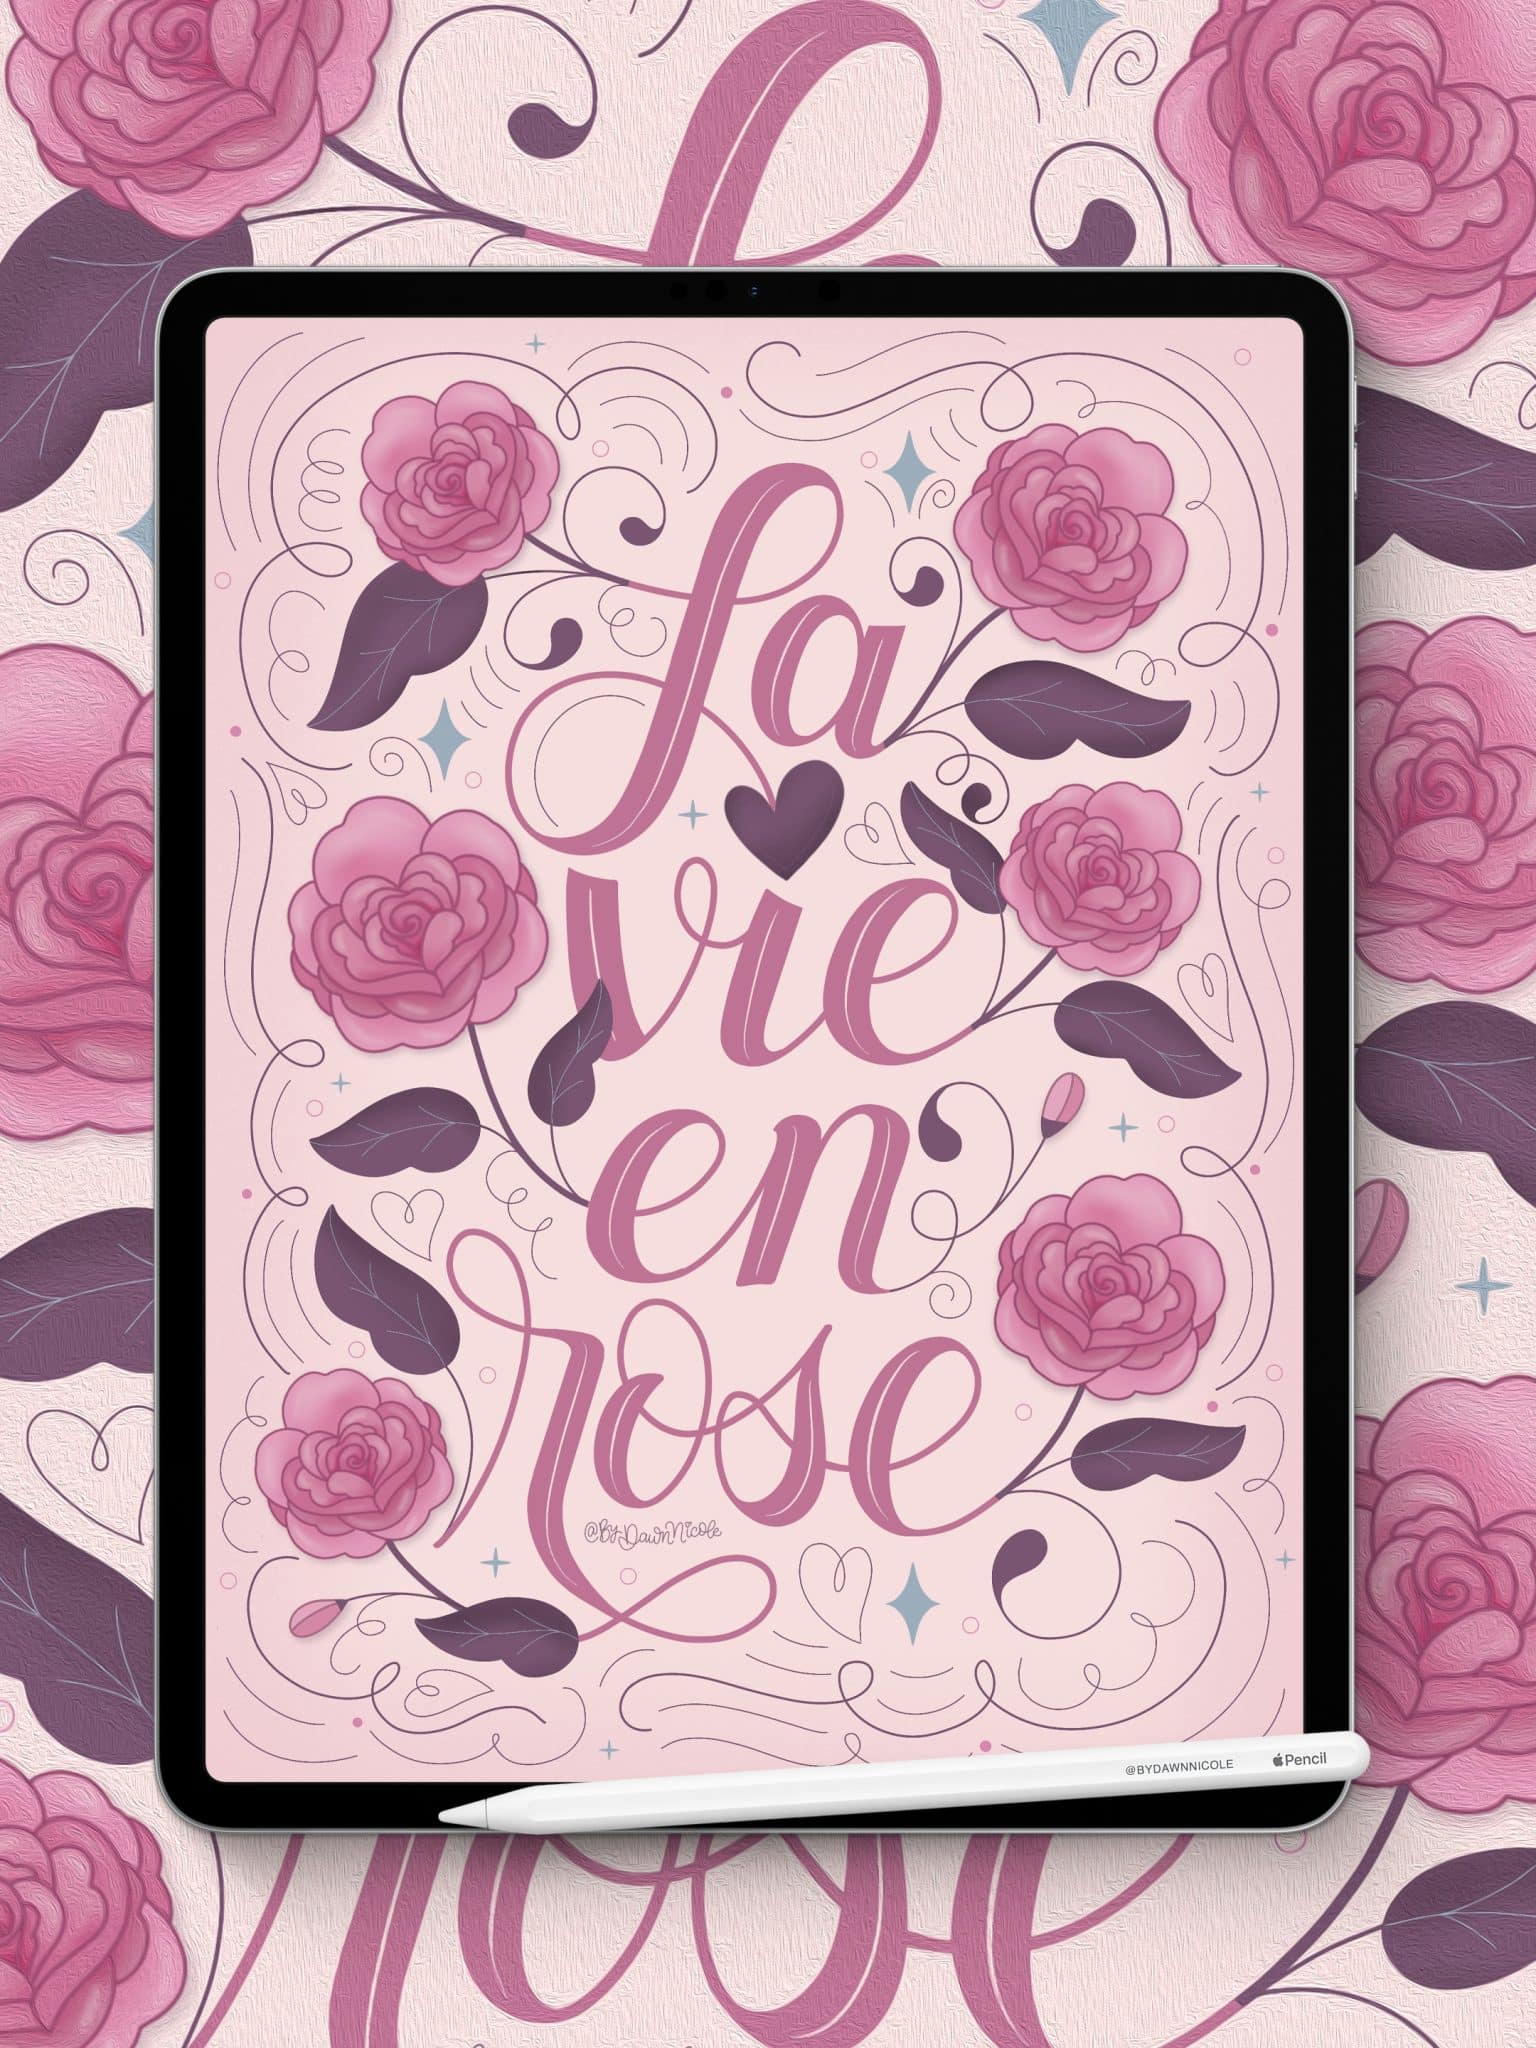
Here’s an example of how I used this rose in a lettering piece. To get the color palette and learn more about the artwork, head over to my La Vie en Rose Procreate Color Palette blog post.
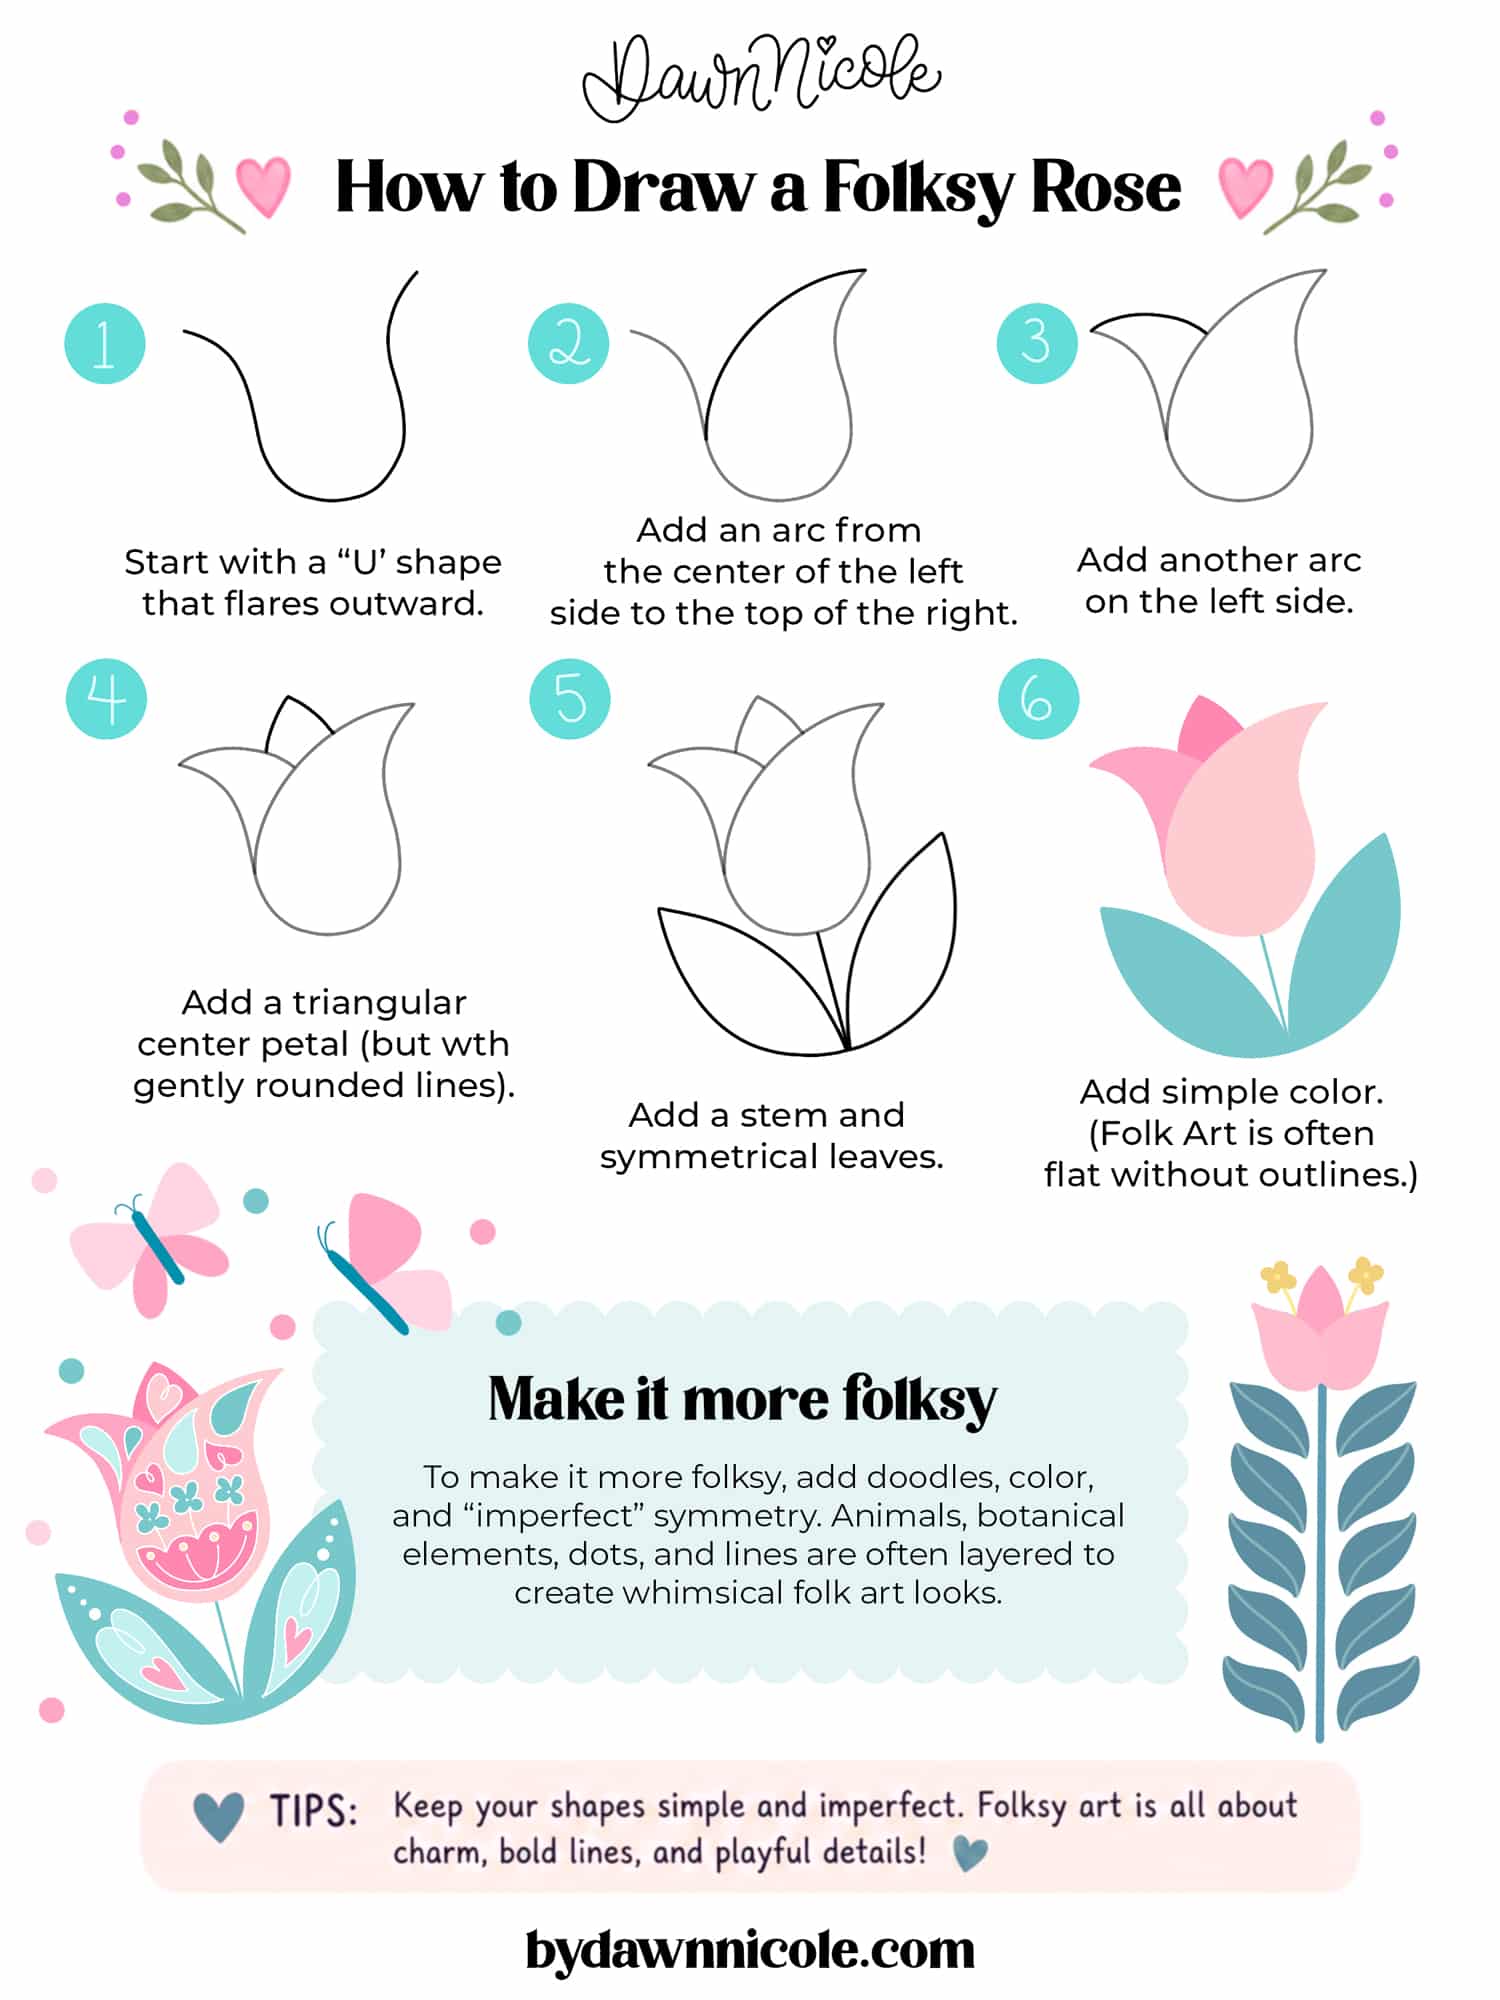
Easy Folksy Rose Drawing
Folksy florals are one of my favorite ways to create whimsical, beginner-friendly artwork. This simple, folksy rose uses soft curves, layered petals, and playful symmetry to create a flower that feels charming and handmade without being complicated to draw.
In this easy step-by-step tutorial, I’ll show you how to build the rose shape, one simple line at a time, then finish it off with flat color and fun folk-art details. Once you learn the basic shape, you can mix and match colors, leaves, hearts, dots, and doodles to make the design completely your own.
If you love this style, check out my Modern Folk Art Stamp Kit for Procreate.
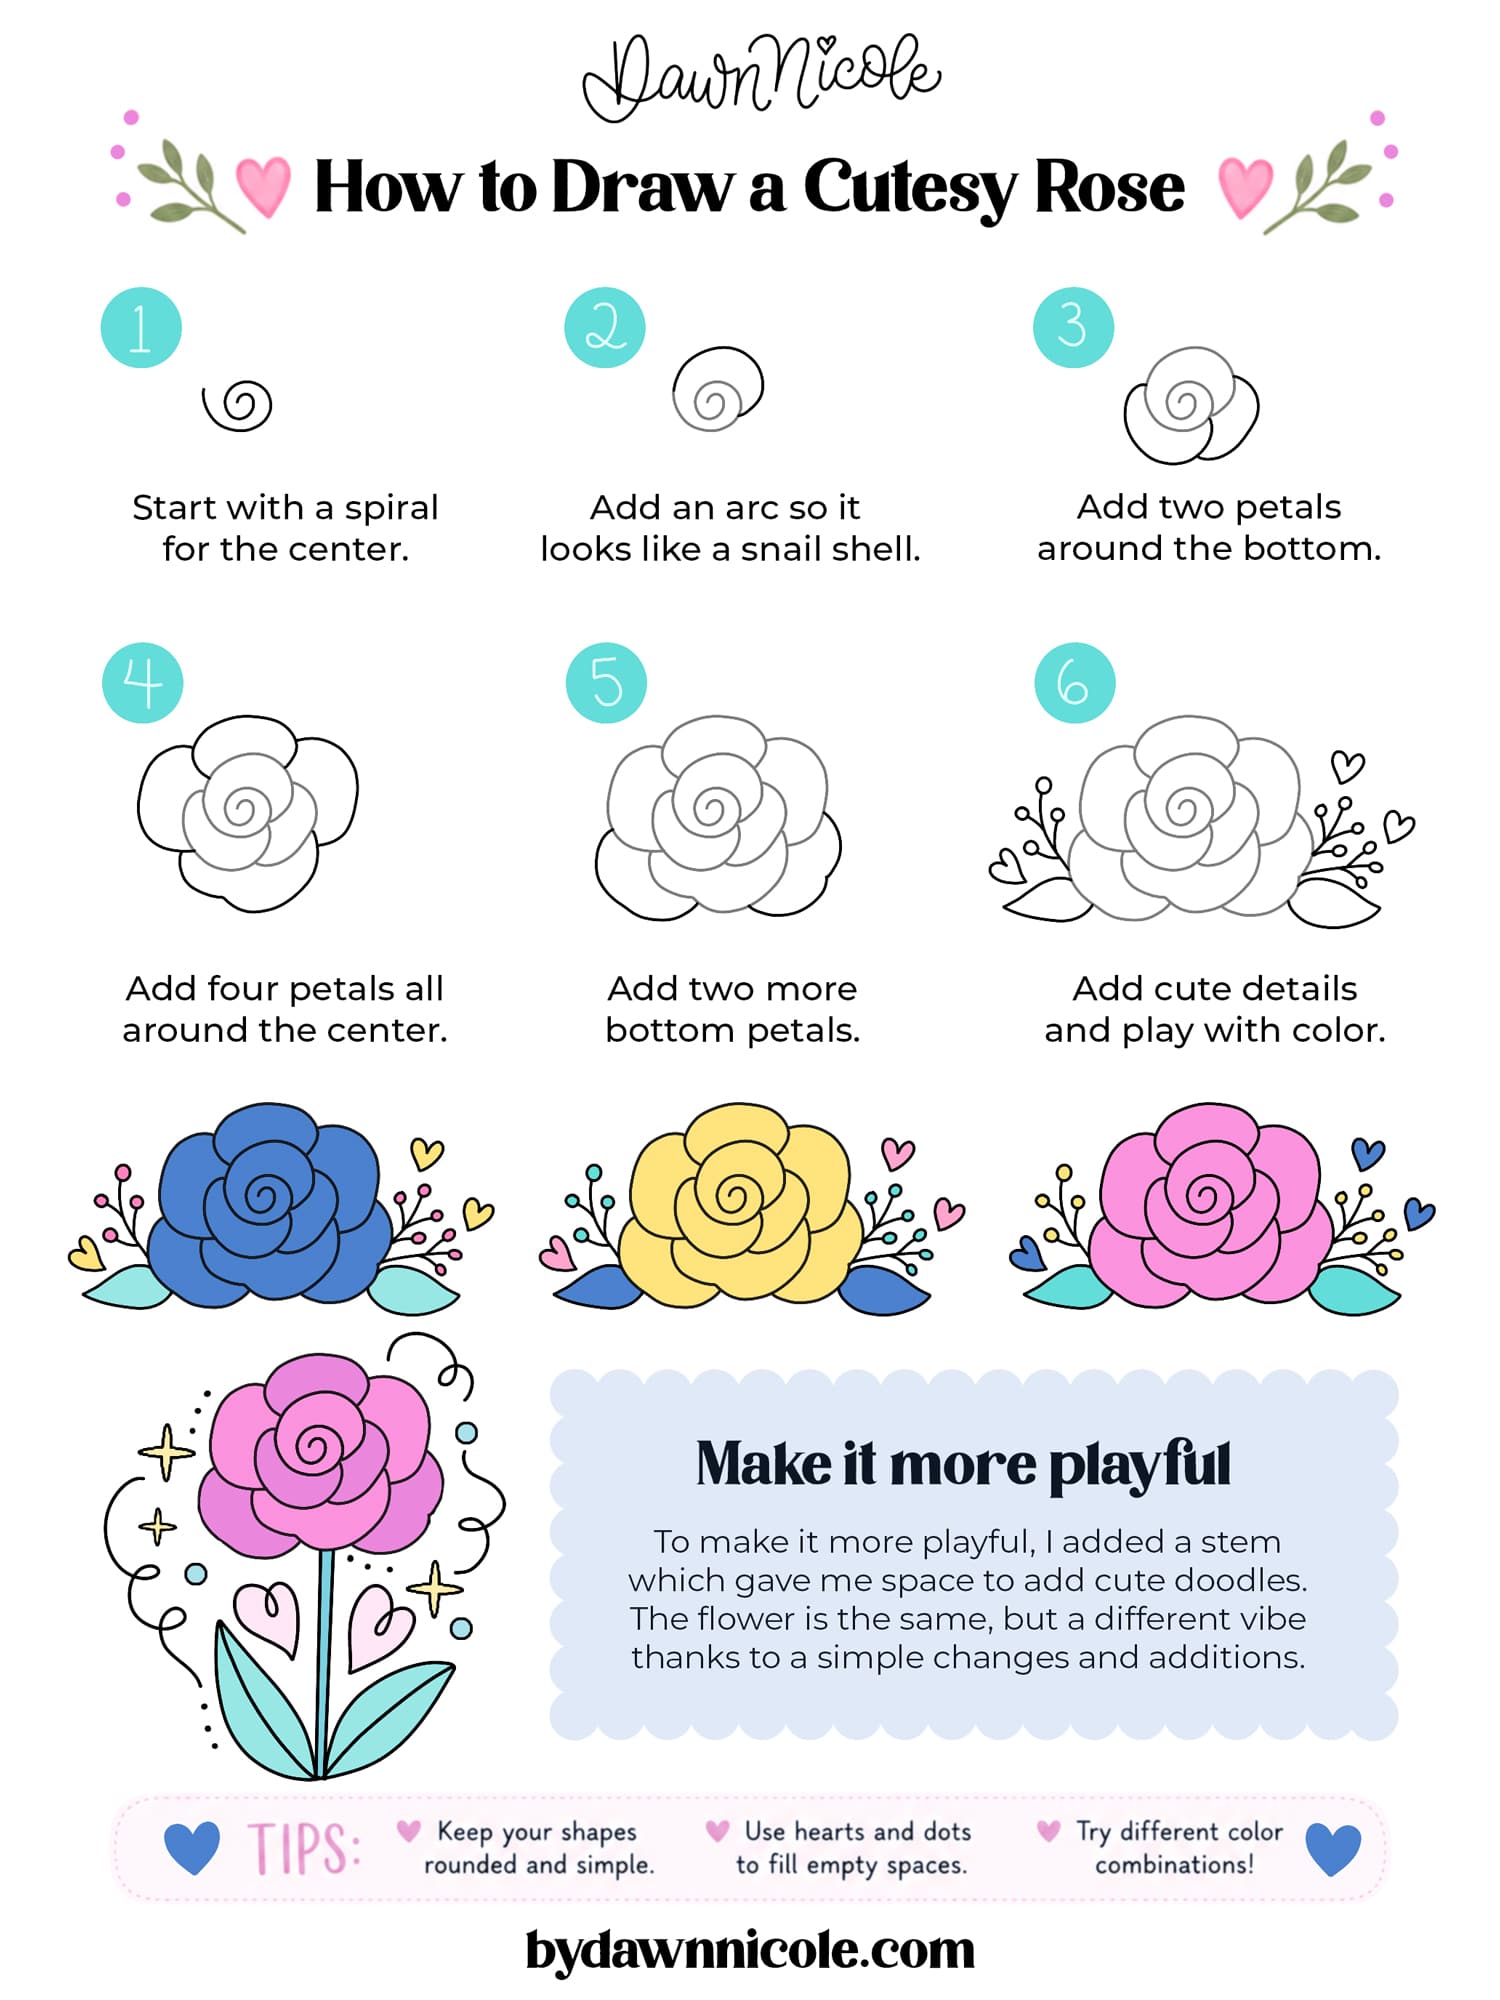
Easy CUTESY Rose Drawing
Looking for a rose that’s a bit more artsy than realistic? This cutesy rose may fit the bill. I’m partial to the playful variation, as shown at the bottom of the graphic. Don’t be afraid to try non-traditional colors. They add to the whimsy and playfulness!
If you love this one, check out my Super Cute Stamp Kit for Procreate.
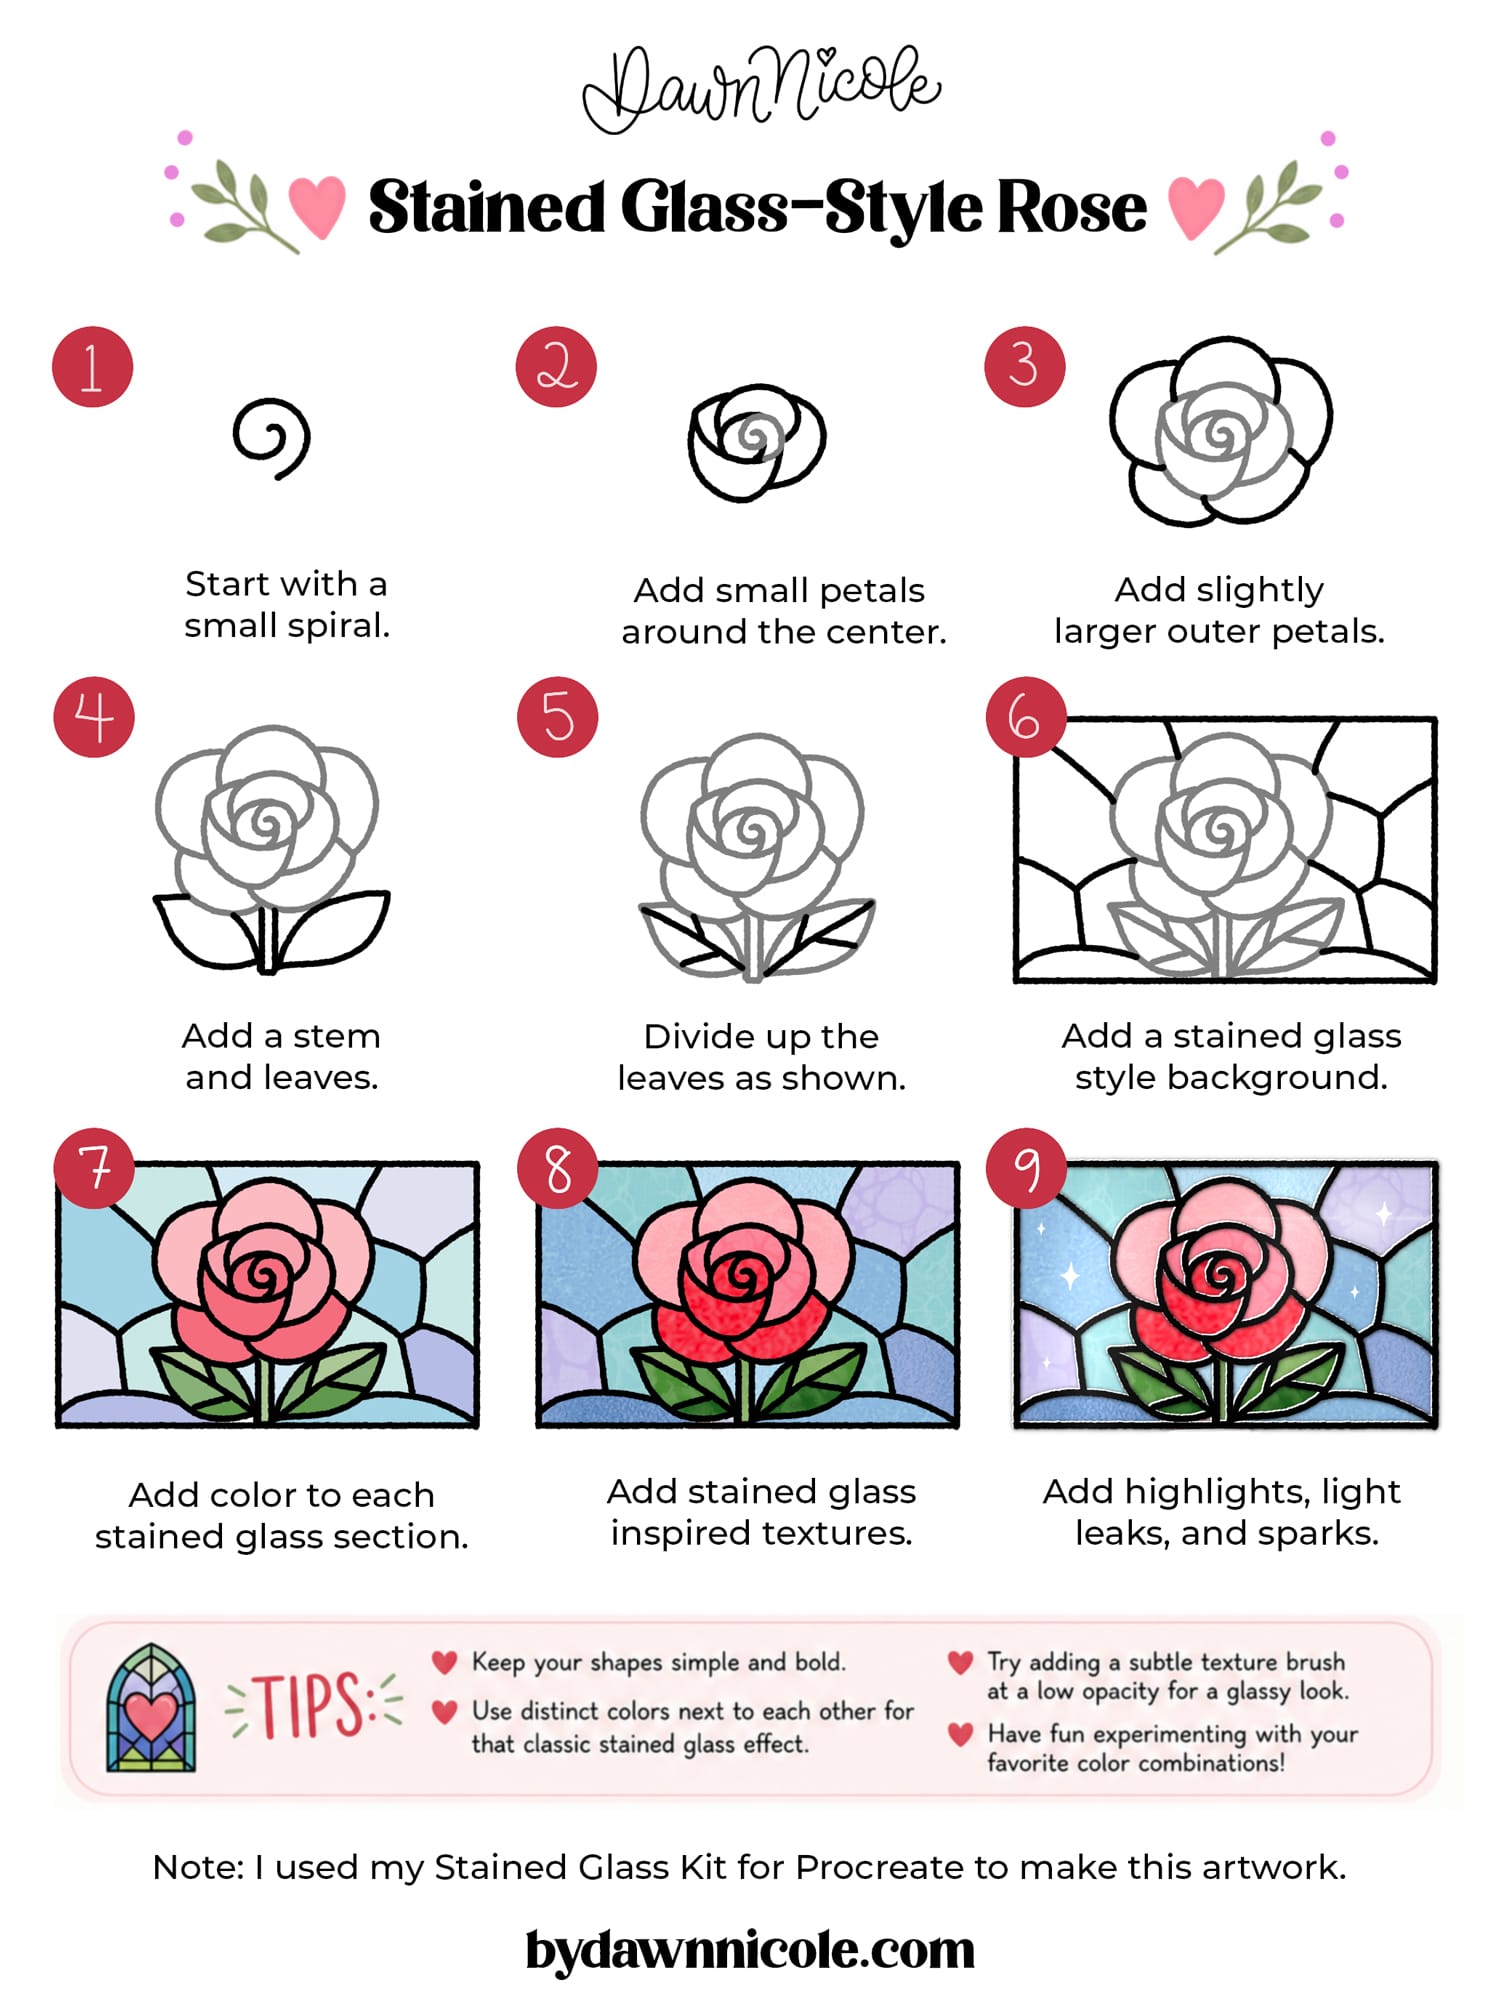
Easy Stained Glass Rose Drawing
Let’s level up a bit and draw a stained-glass-inspired rose. I created this using my Stained Glass Kit for Procreate. Want a video tutorial? Watch a free lesson on how I create Stained Glass Art in Procreate.
Stained Glass Video Tutorial
Tips for Drawing Roses
Drawing roses can look intimidating at first, but they’re actually much easier once you break the flower down into simple shapes and layered petals. Here are a few beginner-friendly tips to help make your rose drawings look more natural and polished:
Start with a Simple Spiral
Most rose drawings begin with a loose spiral in the center. This helps guide the inner petals and keeps your flower balanced as you build outward.
Work from the Inside Out
Instead of trying to draw every petal at once, start with the center petals and gradually add larger petals around them. Roses naturally open outward, so this method makes the process feel much easier.
Don’t Make Every Petal Perfect
Real roses are soft, organic, and slightly imperfect. Varying the size and curve of your petals will make your drawing feel more natural and less stiff.
Use Layering for Depth
Creating separate layers for sketching, color, shading, and highlights makes it easier to edit your rose drawing as you go. This is especially helpful for watercolor and stained glass styles.
Add Contrast with Shadows and Highlights
Even simple shading can make your rose look more dimensional. Try adding darker tones where petals overlap and lighter highlights along the edges of petals.
Experiment with Different Brush Styles
Changing your brush can completely transform the look of your rose drawing. A textured watercolor brush creates a soft, painted effect, while clean monoline brushes are perfect for folksy or stained-glass-inspired roses.
Practice Loose Petal Shapes
You don’t need to memorize an exact formula for roses. Practicing loose “C” and “U” shaped petals will help your roses look more relaxed and natural over time.
Keep Your Color Palette Simple
Using just 2–4 coordinating colors can make your rose illustrations feel more cohesive, especially for beginner-friendly floral artwork.
Easy Rose Drawing FAQs
How do you draw a simple rose for beginners?
The easiest way to draw a rose is to start with a small spiral in the center and build larger petals around it. Keeping the petal shapes loose and simple makes the drawing process much more beginner-friendly.
What is the easiest rose drawing style?
I think folksy roses are usually the easiest for beginners because they focus on simple petal shapes rather than detailed shading or coloring.
Can I draw roses in Procreate as a beginner?
Absolutely! Procreate is great for beginner flower drawings because you can work in layers, undo mistakes easily, and experiment with different brushes and styles as you learn.
What brushes work best for rose drawings in Procreate?
That depends on the style you want to create. Textured watercolor brushes work beautifully for soft painted roses, while monoline or inking brushes are perfect for clean outlines and decorative floral styles.
How do you make a rose drawing look realistic?
Adding depth with shading, highlights, and overlapping petals helps create a more realistic rose drawing. Using varied petal sizes and slightly imperfect shapes also makes roses look more natural.
What colors work best for rose drawings?
Classic pinks and reds are always beautiful, but roses can work in almost any color palette. Try peach, coral, cream, yellow, or even bold fantasy colors for a more playful illustration style.
Why does my rose drawing look flat?
Flat-looking roses usually need more contrast and overlapping petals. Adding darker shadows between petals and brighter highlights along their edges can instantly create more depth.
How can I improve my flower drawings?
The best way to improve is through repetition and experimentation. Try drawing roses in multiple styles, using different brushes, and practicing quick sketches regularly to build confidence and muscle memory.
Ready for more? Learn these 10 Folksy Flowers!
Learn the art of playful lettering with me
- Grab a copy of my book, The Art of Playful Lettering, on Amazon. Some of the info and artwork in this blog post were created for this book. That section of the book also contains color palettes to inspire your lettering creations!
- Check out the Procreate Brush Sets and Online Classes in my lettering shop.
- Pre-order my Modern Folk Art Coloring Book to relax and color my hand-drawn designs.
- Check out my 2025 Playful Lettering Style Challenge.

From the lettering Shop
Check out my five-star rated Procreate Brush Sets, Classes, & Lettering Style Workbooks!
I hope you enjoy this Rose Drawing Guide and Tutorial!
Happy creating!


